Easy Chocolate Covered Strawberries: Perfect, Smooth & Shiny Every Time
Few desserts capture hearts and palates quite like the elegant simplicity of chocolate-covered strawberries. They're a timeless classic, evoking romance, celebration, and pure indulgence. Whether you're planning a special dinner, hosting a gathering, or simply craving a sophisticated yet straightforward treat, mastering the art of making perfectly smooth, shiny, and crack-free chocolate-dipped strawberries at home is a culinary superpower. Forget store-bought versions; with our comprehensive chocolate covered strawberries recipe, you'll create professional-looking confections that taste even better.
Often seen as a gourmet delight, these beautiful berries are surprisingly simple to make. Yet, there are a few clever tricks that elevate them from good to absolutely glorious – ensuring your chocolate doesn't crack, stays beautifully glossy, and adheres perfectly to the juicy fruit. We're here to share those secrets, along with a detailed guide, so you can achieve perfection every single time.
The Foundation of Flawless Chocolate-Covered Strawberries
Choosing and Preparing Your Berries: Dryness is Key!
The journey to perfect chocolate-covered strawberries begins with the star ingredient: the strawberries themselves. Opt for fresh, firm, and medium-sized berries. Medium berries are ideal because they're easy to handle and offer a delightful balance of fruit to chocolate in every bite. Avoid overly ripe or bruised strawberries, as they can release too much moisture.
The absolute most crucial step, often overlooked, is ensuring your strawberries are completely, unequivocally dry. Moisture is the enemy of melted chocolate; even a tiny drop can cause chocolate to seize (turn clumpy and grainy) or, worse, prevent it from adhering smoothly to the berry. Here’s how to prepare them:
- Rinse Gently: Wash your fresh strawberries under cool, running water. Avoid soaking them, as this can cause them to absorb excess water.
- Pat Dry Thoroughly: Using paper towels or a clean kitchen towel, gently pat each strawberry completely dry. Don't rush this step!
- Air Dry for Assurance: After patting, arrange the strawberries on a plate or tray lined with paper towels and let them air dry for at least 20 minutes at room temperature. This crucial waiting period allows any residual moisture to evaporate, guaranteeing the chocolate will stick beautifully.
Mastering the Melt: The Secret to Smooth, Shiny Chocolate
The type of chocolate you choose and how you melt it are paramount for that coveted smooth and shiny finish. While any good quality chocolate can work, specific types and techniques yield superior results for our chocolate covered strawberries recipe.
- The Chocolate Blend: Our recommended approach combines the best of both worlds. Using high-quality milk chocolate melting wafers (such as Ghirardelli) alongside chopped bittersweet chocolate creates a perfect balance of sweetness and depth, while also providing excellent melting properties. The wafers are designed for smooth melting, and the bittersweet chocolate adds a rich complexity that prevents the dessert from being overly sweet.
- The Microwave Method: This is the quickest and easiest way. In a medium microwave-safe bowl, combine your chocolate. Microwave on medium power, stirring every 20 seconds. This intermittent stirring is vital to prevent the chocolate from overheating and burning. Continue until the chocolate is mostly melted, then stir vigorously off-heat until completely smooth. The residual heat will melt any remaining lumps. This typically takes 1 to 1½ minutes in total.
- Double Boiler Alternative: If you prefer more control or are working with larger batches, a double boiler is an excellent option. Place your chocolate in a heatproof bowl set over a saucepan of simmering water (ensure the bowl doesn't touch the water). Stir constantly until melted and smooth.
Pro Tip: Avoid overheating the chocolate. Overheated chocolate can become dull, thick, or even seize. Low and slow is the key to a gorgeous, glossy melt.
The Game-Changing Touch: A Hint of Oil
This is where our recipe truly shines and differentiates itself! The clever addition of a tiny amount of neutral oil to your melted chocolate is a game-changer for two primary reasons, directly addressing common frustrations:
- Prevents Cracking and Sliding: Have you ever bitten into a chocolate-covered strawberry only for the chocolate shell to crack and fall off? A small amount of oil softens the chocolate just enough so it maintains flexibility when bitten into, preventing those disastrous cracks.
- Boosts Shine: While melted chocolate is naturally shiny, it can sometimes lose some of that luster as it sets. The oil helps to maintain a beautiful, glossy sheen, making your finished strawberries look absolutely professional.
Add about ½ to 1 teaspoon of a neutral-flavored oil (like coconut oil, vegetable oil, or grapeseed oil) to your chocolate when you begin melting it. Stir it in well. This simple addition makes all the difference in achieving that "perfect, smooth & shiny" result. For more insights into achieving that perfect, crack-free coating and ultimate shine, check out our guide on No-Fail Chocolate Covered Strawberries: Tips for Shine & No Cracks.
Your Foolproof Chocolate Covered Strawberries Recipe: Step-by-Step
Ingredients:
- 10-12 medium fresh strawberries, stems intact
- ½ cup (3 oz.) milk chocolate melting wafers (e.g., Ghirardelli)
- 3 oz. chopped bittersweet chocolate (high quality recommended)
- ½ to 1 teaspoon neutral-flavored oil (e.g., coconut, vegetable, or grapeseed oil) – optional, but highly recommended for shine and flexibility
Equipment:
- Medium microwave-safe bowl
- Rubber spatula or spoon
- Baking tray or plate
- Waxed paper or parchment paper
Instructions:
- Prepare Strawberries: Rinse strawberries under cool running water. Gently pat each berry thoroughly dry with paper towels. Arrange on a clean plate or tray lined with fresh paper towels and let air dry for at least 20 minutes to ensure they are completely moisture-free.
- Melt Chocolate: In your microwave-safe bowl, combine the milk chocolate melting wafers, chopped bittersweet chocolate, and the neutral oil (if using). Microwave on medium power, stirring well every 20 seconds, until the mixture is completely melted and smooth. This should take 1 to 1½ minutes. Stir any remaining lumps off-heat until velvety.
- Dip the Berries: Hold a strawberry by its stem (or the leaves if the stem is small). Dip it into the melted chocolate, swirling gently to coat about two-thirds to three-quarters of the berry. Lift it slowly, allowing any excess chocolate to drip back into the bowl. You can gently tap the stem against the rim of the bowl to encourage drips.
- Set the Chocolate: Place the dipped strawberry onto a baking tray lined with waxed paper or parchment paper. Repeat with the remaining strawberries.
- Allow to Firm: Let the dipped strawberries stand at room temperature for about 1 hour, or until the chocolate coating is firm and set. If your kitchen is particularly warm, you can transfer the tray to the refrigerator for about 10-15 minutes to speed up the setting process. Avoid leaving them in the fridge for too long, as this can cause condensation.
Storage & Serving: Keeping Your Masterpiece Fresh
The magic of fresh chocolate-covered strawberries is best experienced soon after they are made. We highly recommend serving and enjoying them once the chocolate has fully set.
However, if you need to prepare them slightly in advance, here’s how to store them properly:
- Short-Term Storage: You can store dipped strawberries, loosely covered, at room temperature for up to 24 hours. Placing them in a cool, dry spot is ideal.
- Avoid Airtight Containers: This is crucial! Do NOT place chocolate-covered strawberries in an airtight container. Strawberries naturally "weep" or release moisture. In an airtight environment, this moisture becomes trapped, causing condensation that will make your beautiful chocolate coating sticky, soggy, or even cause it to seize.
- Refrigeration Caution: While a quick 10-15 minute stint in the fridge can help set the chocolate if your kitchen is warm, avoid extended refrigeration for the same reason mentioned above regarding moisture.
These delightful treats are perfect for any occasion – from a romantic evening for two to a festive dessert platter. They make an impressive yet fuss-free addition to any spread, offering a bite-sized indulgence that satisfies without being overly heavy.
Beyond the Basics: Tips for Next-Level Indulgence
Once you’ve mastered the basic chocolate covered strawberries recipe, the possibilities for customization are endless!
- Flavor Variations: Experiment with different types of chocolate. Dark chocolate offers a sophisticated bitterness, while white chocolate provides a creamy sweetness. You could also add a tiny drop of food-grade extract to your melted chocolate – a hint of peppermint, almond, or orange zest can create a unique flavor profile. For an adventurous twist, a pinch of chili powder can add a subtle kick!
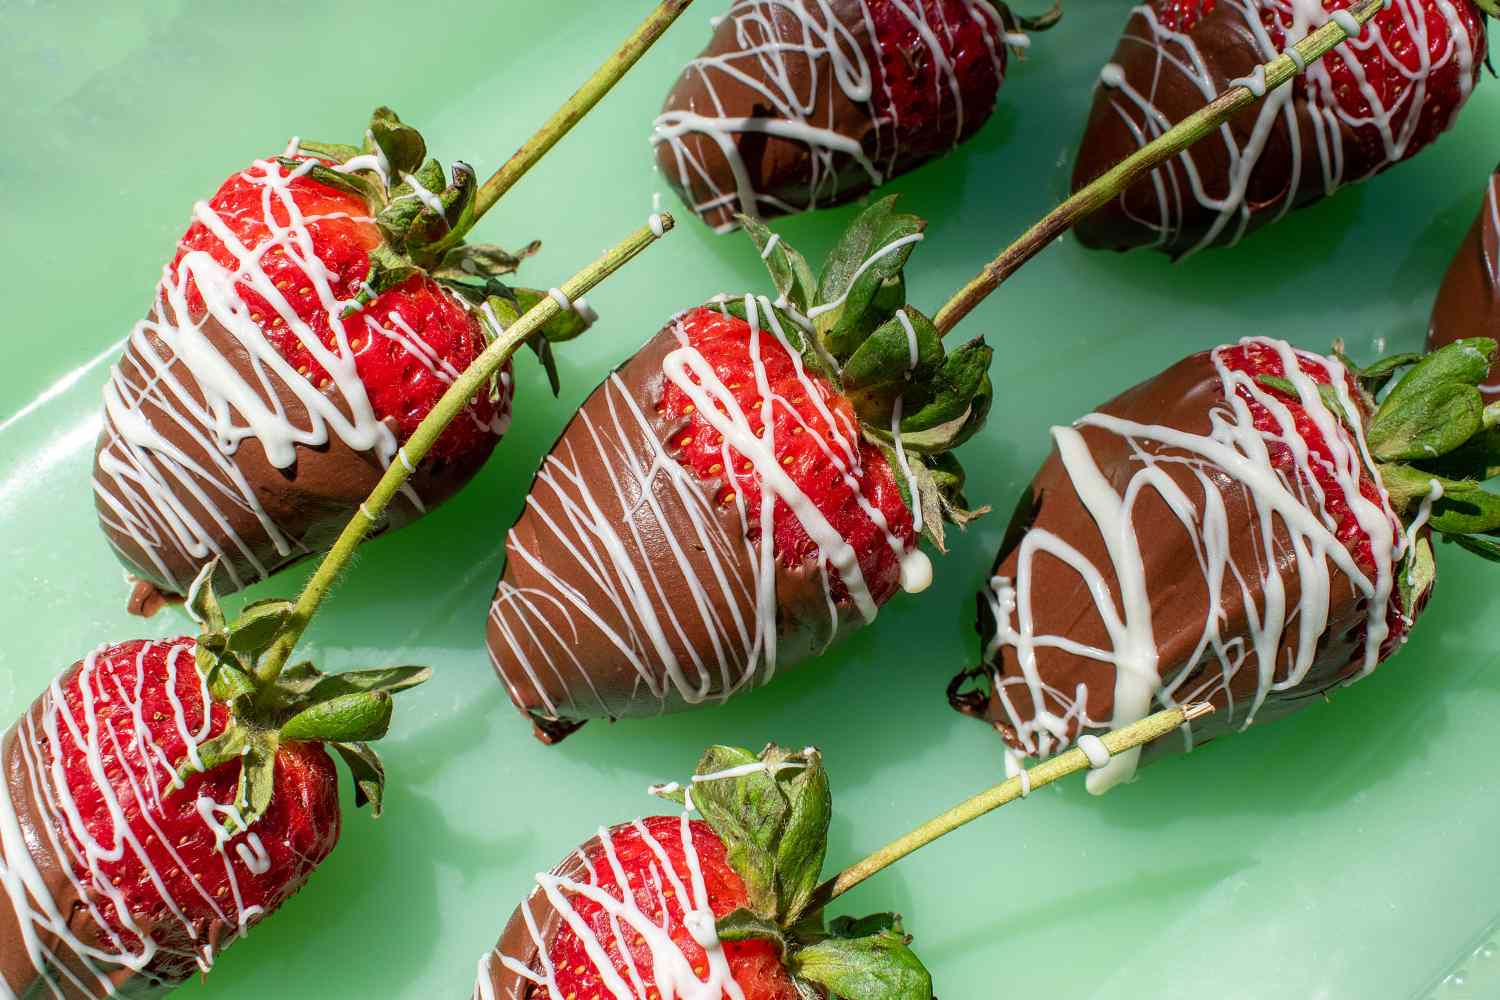
- Decorative Drizzles and Toppings: Elevate the visual appeal by drizzling contrasting chocolate over the set berries. For example, a zig-zag of melted white chocolate over dark-dipped berries, or vice versa. Sprinkles, finely chopped nuts (pistachios, almonds, pecans), shredded coconut, or even edible glitter can add texture and sparkle before the chocolate fully sets.
- Health-Conscious Delight: Chocolate-covered strawberries are often hailed as the "ultimate emergency 3-ingredient dessert" because they're quick, impressive, and relatively light. At just around 47 calories per piece, they offer a sweet indulgence without the heavy guilt of many other desserts. They are naturally gluten-free and a wonderful option for gatherings where dietary restrictions might be a concern, proving that delicious doesn't have to mean complicated or calorific. If you're looking for an incredibly quick, low-calorie treat that still impresses, our article on Ingredient Chocolate Covered Strawberries: Quick, Low-Calorie Dessert offers even more insights.
Conclusion
With this comprehensive guide, you now possess all the knowledge and tips to create truly perfect, smooth, and shiny chocolate-covered strawberries in your own kitchen. From selecting the freshest berries and ensuring their absolute dryness to mastering the chocolate melt and incorporating that ingenious touch of oil, every step contributes to a flawless finish. This easy chocolate covered strawberries recipe is more than just a dessert; it's a delightful experience waiting to be shared, offering a blend of fresh fruit and rich chocolate that is simply irresistible. So go ahead, grab your ingredients, and prepare to impress yourself and everyone else with these exquisite, homemade treats!
